Signing commits in GitHub & VS Code
Why should you be signing commits? 🤔
If you’ve landed on this blog post looking how to use signed commits… you probably already know the motivation behind signing commits and/or tags. The 2 main advantages which I’ve distilled from the official Git documentation:
- Verify that commits are from a trusted source
- Signing your own work, preventing others from pretending to be you
Git is cryptographically secure, but it’s not foolproof. If you’re taking work from others on the internet and want to verify that commits are actually from a trusted source, Git has a few ways to sign and verify work using GPG.
As you can see, we’ll need GnuPG, commonly referred to as GPG. I’ll provide 2 different methods to get things working:
- Method 1: via CLI, using the GPG command line tools
- Method 2: via a GUI frontend, called Gpg4win
Method 1: CLI
Installation
Download & install GnuPG
Verify successful installation by running:
gpg --version
Example output:
gpg (GnuPG) 2.2.27
libgcrypt 1.8.7
Copyright (C) 2021 g10 Code GmbH
License GNU GPL-3.0-or-later <https://gnu.org/licenses/gpl.html>
This is free software: you are free to change and redistribute it.
There is NO WARRANTY, to the extent permitted by law.

Home: C:/Users/Sander/AppData/Roaming/gnupg
Supported algorithms:
Pubkey: RSA, ELG, DSA, ECDH, ECDSA, EDDSA
Cipher: IDEA, 3DES, CAST5, BLOWFISH, AES, AES192, AES256, TWOFISH,
        CAMELLIA128, CAMELLIA192, CAMELLIA256
Hash: SHA1, RIPEMD160, SHA256, SHA384, SHA512, SHA224
Compression: Uncompressed, ZIP, ZLIB, BZIP2
Create a key
Generate a new key:
gpg --full-generate-key
The following prompt will show up:
Please select what kind of key you want:
   (1) RSA and RSA (default)
   (2) DSA and Elgamal
   (3) DSA (sign only)
   (4) RSA (sign only)
  (14) Existing key from card
👉 You’ll want RSA and RSA here, so accept the default value by pressing Enter.
Next up, the key size:
RSA keys may be between 1024 and 4096 bits long.
What keysize do you want? (3072)
👉 As you can see, the default key size is 3072 bits. Enter 4096
Set the length of time the key should be valid. Let’s set it to never expire by pressing Enter:
Please specify how long the key should be valid.
         0 = key does not expire
      <n>  = key expires in n days
      <n>w = key expires in n weeks
      <n>m = key expires in n months
      <n>y = key expires in n years
Key is valid for? (0)
You’ll then see the following warning, simply enter y
Key does not expire at all
Is this correct? (y/N)
Next up, enter the following information:
- Real name: Test User
- Email address: test@example.com
- Comment: you can leave this blank
GnuPG needs to construct a user ID to identify your key.

Real name: Test User
Email address: test@example.com
Comment:
You selected this USER-ID:
    "Test User <test@example.com>"

Change (N)ame, (C)omment, (E)mail or (O)kay/(Q)uit?
If you’re OK with the information mentioned above, enter O
Once you’ve entered a secure passphrase, the keys should be generated:
We need to generate a lot of random bytes. It is a good idea to perform
some other action (type on the keyboard, move the mouse, utilize the
disks) during the prime generation; this gives the random number
generator a better chance to gain enough entropy.

Feel free to start rambling on your keyboard, after a while you should see the following:
public and secret key created and signed.

pub   rsa4096 2021-01-24 [SC]
      2F1F843BB662CFC2F34B05B0F0A57F06DA4DB096
uid                      Test User <test@example.com>
sub   rsa4096 2021-01-24 [E]
Now run gpg --list-secret-keys --keyid-format LONG:
C:/Users/Sander/AppData/Roaming/gnupg/pubring.kbx
------------------------------------------------
sec   rsa4096/F0A57F06DA4DB096 2021-01-24 [SC]
      2F1F843BB662CFC2F34B05B0F0A57F06DA4DB096
uid                 [ultimate] Test User <test@example.com>
ssb   rsa4096/A1A9346A1C34E134 2021-01-24 [E]
Copy the GUID from the sec line, which starts right after the rsa4096/.
This is your GPG key ID. The GPG key ID in the example above would be F0A57F06DA4DB096.
Next up, we’ll export our GPG key ID in ASCII format by running gpg --armor --export <your ID>:
-----BEGIN PGP PUBLIC KEY BLOCK-----

mQENBFxEQeMBCACtgu58j4RuE34OW3Xoy4PIXlLv/8P+FUUFs8Dk4WO5zUJN2NfN
45fIASdKcH8cV2wbCVwjKEP0h4p5IE+lrwQK7bwYx7Qt+qmrm5eLMUM8IvXA18wf
AOPS7XeKTzxa4/jWagJupmmYL+MuV9o5haqYplOYCcVR135KAZfx743YuWcNqvcr
3Em0+gh4F2TXsefjniwuJRGY3Kbb/MAM2zC2f7FfCJVb1C30OLB+KwCddZP/23ll
nOqmzaVF0qQrHQ5EZGK3j3S4fzHNq14TMS3c21YkPOO/DV6BkgIHtG5NIIdVEdQh
wV8clpj0ZP7ShIE8cDhTy8k+xrIByPUVfpMpABEBAAG0J0JpbGwgQnVjaGFuYW4g
PHcuYnVjaGFuYW5AbmFwaWVyLmFjLnVrPokBVAQTAQgAPhYhBK9cqX/wEcCpQ6+5
TFPDJcqRPXoQBQJcREHjAhsDBQkDwmcABQsJCAcCBhUKCQgLAgQWAgMBAh4BAheA
AAoJEFPDJcqRPXoQ2KIH/2sRAsqbrqCMNMRsiBo9XtCFzQ052odbzubIScnwzrDF
Y9z+qPSAwaWGO+1R3LPDH5sMLQ2YOsNqg8VvTJBtOjR9YGNX9/bqqVFRKKSQ0HiD
Sb2M7phBdk4WLkqLZ/AfgHaLKpfNX0bq7WhqZ+Pez0nqjN08JkIog7LhaQZh/Chf
0pl+wHV0rEFuaDQn83yF5DWB1Dt4fbzfVUrEJb92tSrReHALQQA3h5WkTA0qxhDd
9XyEWknDrYCWIWoj0XWjiVUre2fw3SKn8KHvJDeDYVKzYy18oA+da+xgs9b+n+Tq
mMlfslWhw9wRyp0jbVLEs3yxLgE4elbCCmgiTNpnmMW5AQ0EXERB4wEIAKCPJqmM
o8m6Xm163XtAZnx3t02EJSAV6u0yINIC8aEudNWg+/ptKKanUDm38dPnOl1mgOyC
FEu4qFJHbMidkEEac5J0lgvhRK7jv94KF3vxqKr/bYnxltghqCfXesga9jfAHV8J
M6sx4exOoc+/52YskpvDUs/eTPnWoQnbgjP+wsZpNq0owS6yO5urDfD6lvefgK5A
TfB9lQUE0lpb6IMKkcBZZvpZWOchbwPWCB9JZMuirDSyksuTLdqgEsW7MyKBjCae
E/THuTazumad/PyEb0RCbODdMb55L6CD2W2DUquVBLI9FN6KTYWk5L/JzNAIWBV9
TKfevup933j1m+sAEQEAAYkBPAQYAQgAJhYhBK9cqX/wEcCpQ6+5TFPDJcqRPXoQ
BQJcREHjAhsMBQkDwmcAAAoJEFPDJcqRPXoQGRgH/3592g1F4+WRaPbuCgfEMihd
ma5gplU2J7NjNbV9IcY8VZsGw7UAT7FfmTPqlvwFM3w3gQCDXCKGztieUkzMTPqb
LujBR4y55d5xDY6mP40zwRgdRlen2XsgHLPajRQpAhZq8ZvOdGe/ANCyXVdFHbGy
aFAMUfAhxkbITQKXH+EIkCHXDtDUHUxmAQvsZ8Z+Jm+ZwdhWkMsK43tw8UXLIynp
AeOoATdohke3EVK5+0Dc/jezcUWz2IKfw7LB3sQ4c6H8Ey8PThlNAIgwMCDp5WTB
DmFoRWTU6CpKtwIg/lb1ncbslH2xAFeUX6ASHXR8vBOnIXWss21FuAaNmWe4lmw=
=S+hs
-----END PGP PUBLIC KEY BLOCK-----
Method 2: GUI frontend
Install Gpg4Win. This tool actually consists of multiple components:
| GnuPG | The backend; this is the actual encryption tool. |
| Kleopatra | A certificate manager for OpenPGP and X.509 (S/MIME) and common crypto dialogs. |
| GPA | An alternative certificate manager for OpenPGP and X.509 (S/MIME). |
| GpgOL | A plugin for Microsoft Outlook 2010/2013/2016/2019 (email encryption). With Outlook 2010 and higher GpgpOL supports MS Exchange Server. |
| GpgEX | A plugin for Microsoft Explorer (file encryption). |
Upon running the Gpg4Win installer GnuPG should be selected by default. Make sure you install Kleopatra as well. GPA, GpgOL and GpgEX aren’t used in any of the subsequent steps.
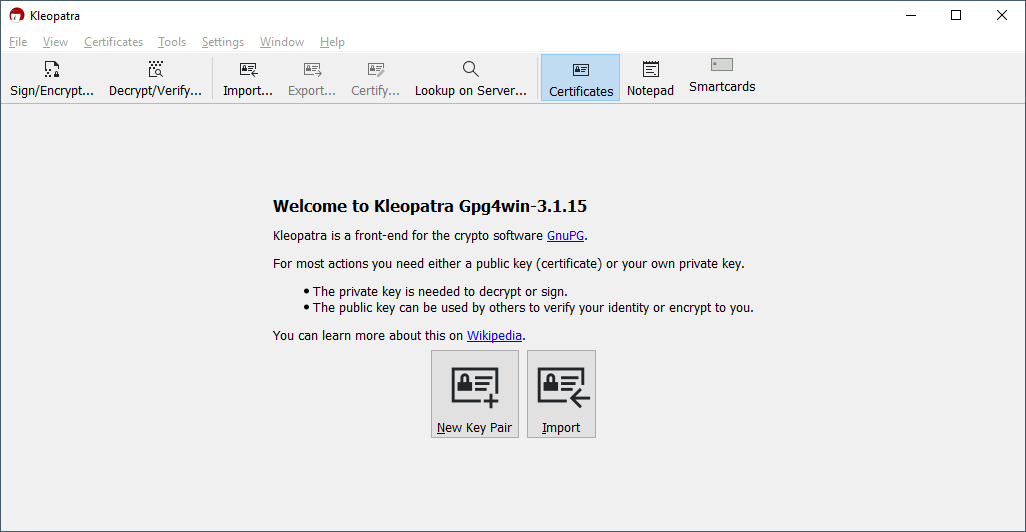
Once you’ve completed the installation process, launch Kleopatra and click New Key Pair:
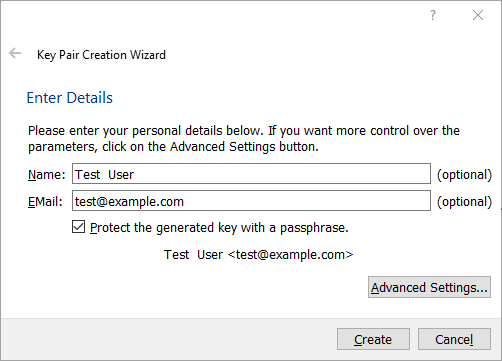
In the Key Pair Creation Wizard:
- Enter your Name and Email.
- Tick the Protect the generated key with a passphrase. checkbox.
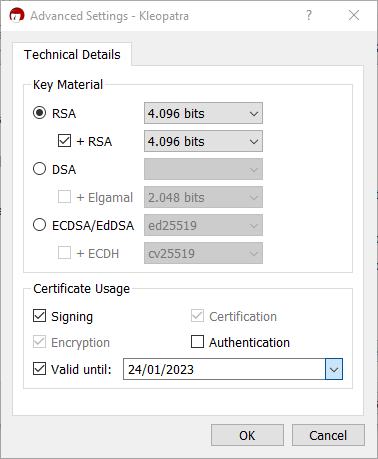
- Go to Advanced Settings… and make sure to set the number of RSA bits to 4.096 as this is a prerequisite for GitHub.
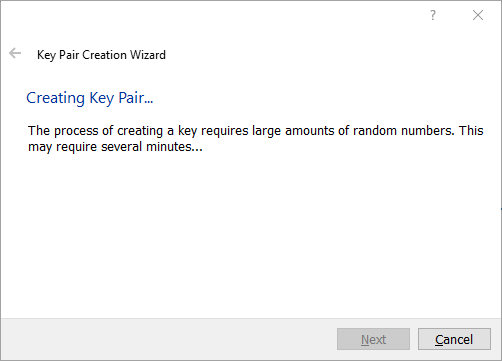
You’ll be prompted to enter a passphrase, after which the key pair will be generated:
Click Finish:
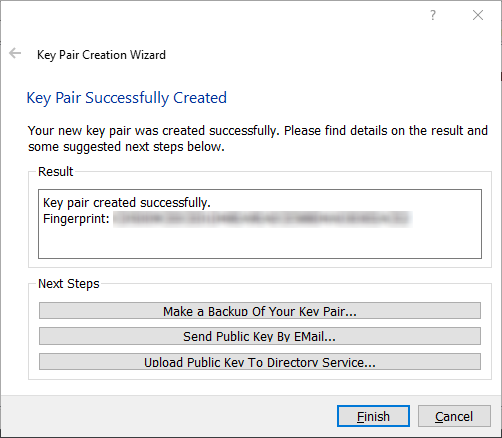
In the main view, select your newly generated key pair and click Export…
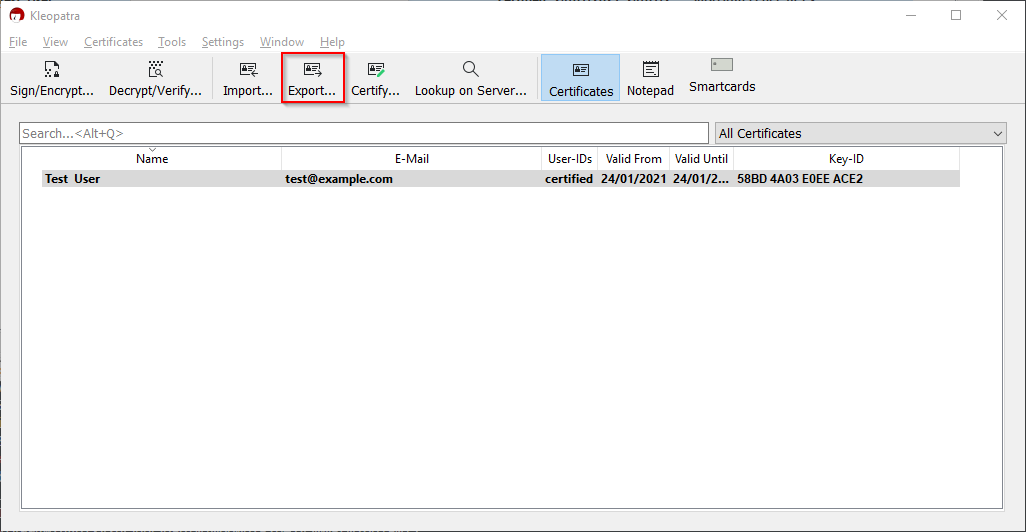
Kleopatra will prompt you to save your public key in ASCII format, using the .asc file format.
Navigate to the location which holds your .asc file and open it. It should look something like this:
-----BEGIN PGP PUBLIC KEY BLOCK-----

mQENBFxEQeMBCACtgu58j4RuE34OW3Xoy4PIXlLv/8P+FUUFs8Dk4WO5zUJN2NfN
45fIASdKcH8cV2wbCVwjKEP0h4p5IE+lrwQK7bwYx7Qt+qmrm5eLMUM8IvXA18wf
AOPS7XeKTzxa4/jWagJupmmYL+MuV9o5haqYplOYCcVR135KAZfx743YuWcNqvcr
3Em0+gh4F2TXsefjniwuJRGY3Kbb/MAM2zC2f7FfCJVb1C30OLB+KwCddZP/23ll
nOqmzaVF0qQrHQ5EZGK3j3S4fzHNq14TMS3c21YkPOO/DV6BkgIHtG5NIIdVEdQh
wV8clpj0ZP7ShIE8cDhTy8k+xrIByPUVfpMpABEBAAG0J0JpbGwgQnVjaGFuYW4g
PHcuYnVjaGFuYW5AbmFwaWVyLmFjLnVrPokBVAQTAQgAPhYhBK9cqX/wEcCpQ6+5
TFPDJcqRPXoQBQJcREHjAhsDBQkDwmcABQsJCAcCBhUKCQgLAgQWAgMBAh4BAheA
AAoJEFPDJcqRPXoQ2KIH/2sRAsqbrqCMNMRsiBo9XtCFzQ052odbzubIScnwzrDF
Y9z+qPSAwaWGO+1R3LPDH5sMLQ2YOsNqg8VvTJBtOjR9YGNX9/bqqVFRKKSQ0HiD
Sb2M7phBdk4WLkqLZ/AfgHaLKpfNX0bq7WhqZ+Pez0nqjN08JkIog7LhaQZh/Chf
0pl+wHV0rEFuaDQn83yF5DWB1Dt4fbzfVUrEJb92tSrReHALQQA3h5WkTA0qxhDd
9XyEWknDrYCWIWoj0XWjiVUre2fw3SKn8KHvJDeDYVKzYy18oA+da+xgs9b+n+Tq
mMlfslWhw9wRyp0jbVLEs3yxLgE4elbCCmgiTNpnmMW5AQ0EXERB4wEIAKCPJqmM
o8m6Xm163XtAZnx3t02EJSAV6u0yINIC8aEudNWg+/ptKKanUDm38dPnOl1mgOyC
FEu4qFJHbMidkEEac5J0lgvhRK7jv94KF3vxqKr/bYnxltghqCfXesga9jfAHV8J
M6sx4exOoc+/52YskpvDUs/eTPnWoQnbgjP+wsZpNq0owS6yO5urDfD6lvefgK5A
TfB9lQUE0lpb6IMKkcBZZvpZWOchbwPWCB9JZMuirDSyksuTLdqgEsW7MyKBjCae
E/THuTazumad/PyEb0RCbODdMb55L6CD2W2DUquVBLI9FN6KTYWk5L/JzNAIWBV9
TKfevup933j1m+sAEQEAAYkBPAQYAQgAJhYhBK9cqX/wEcCpQ6+5TFPDJcqRPXoQ
BQJcREHjAhsMBQkDwmcAAAoJEFPDJcqRPXoQGRgH/3592g1F4+WRaPbuCgfEMihd
ma5gplU2J7NjNbV9IcY8VZsGw7UAT7FfmTPqlvwFM3w3gQCDXCKGztieUkzMTPqb
LujBR4y55d5xDY6mP40zwRgdRlen2XsgHLPajRQpAhZq8ZvOdGe/ANCyXVdFHbGy
aFAMUfAhxkbITQKXH+EIkCHXDtDUHUxmAQvsZ8Z+Jm+ZwdhWkMsK43tw8UXLIynp
AeOoATdohke3EVK5+0Dc/jezcUWz2IKfw7LB3sQ4c6H8Ey8PThlNAIgwMCDp5WTB
DmFoRWTU6CpKtwIg/lb1ncbslH2xAFeUX6ASHXR8vBOnIXWss21FuAaNmWe4lmw=
=S+hs
-----END PGP PUBLIC KEY BLOCK-----
GitHub configuration
Regardless of which method (CLI or Gpg4win) you used earlier, you should have ended up with your PGP public key. Copy paste the public key and navigate to your GitHub settings.
⚠️ Include the lines at the very top and bottom containing -----BEGIN PGP PUBLIC KEY BLOCK----- and -----END PGP PUBLIC KEY BLOCK-----.
Select Account settings > SSH and GPG keys and click New GPG key. Paste the contents of your public key and click Add GPG key:
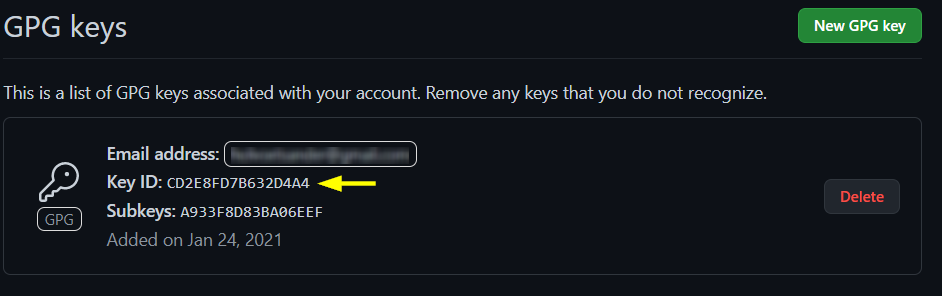
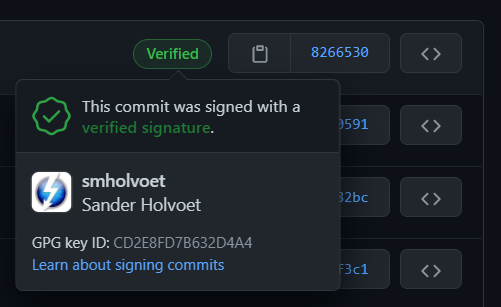
Copy the Key ID (CD2E8FD7B632D4A4 in this example), which we’ll be needing to tell Git about our GPG key.
Visual Studio Code / Git configuration
Open a new Terminal window in VS Code (Terminal > New Terminal).
Set your signing key (replace CD2E8FD7B632D4A4 with your own key):
git config --global user.signingkey CD2E8FD7B632D4A4
Tell Git to sign your commits automatically:
git config --global commit.gpgsign true
⚠️If you don’t want to sign your commits automatically, use the -S flag: git commit -S -m "<commit message>"
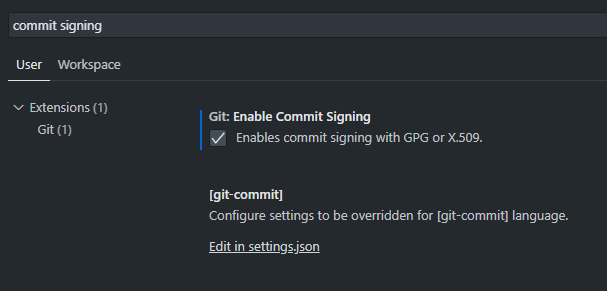
Navigate to File > Preferences > Settings and search for “commit signing”. Select the Enable Commit Signing option:
Try it out
Make some local changes, commit and push them to GitHub… and you should see a nice
✅ Verified badge next to your commit ID:
Comments