Flashing your Dell PERC H310 to IT firmware (UEFI)
I’ve recently acquired a second-hand Dell H310 RAID controller card, which I’ll be using in my future ZFS build. Let’s start off with some key specs:
- Supported RAID modes: 0, 1, 5, 10, 50
- Interface: PCIe 2.0 x8
- Internal Connectors: 2 x SFF-8087 mini-SAS
- Chipset: LSI SAS 2008 (more info)

For those interested: an extensive spec sheet of the H310 can be found here. The fact that this card contains an LSI I/O Controller will allow us to do some fun stuff with it. There are actually tons of OEM models who offer a far cheaper solution than purchasing an original LSI 9211-8i card. Besides the Dell H310, another good card is the IBM M1015 which can be found all over eBay and offers a great alternative to the H310.
I for one chose the H310 over the M1015 as the former has its mini-SAS ports placed vertically, not horizontally like the M1015 does. This might seem like a minor detail, but I really do prefer having them placed vertically, especially when you have to run 2 forward breakout cables through your (possibly very compact) server case. Having the ports placed at the very end of the PCIe card is another perk in my opinion, as it brings you closer to the backplane of your case and it leaves you some room for cable management.
IR vs IT firmware
Most HBA’s are usually shipped with the default IR or Integrated RAID firmware which will allow you to use the most common RAID forms like RAID 0, 1, 5, etc. The firmware Initiator Target (IT) on the other hand will simply use the card in passthrough mode, it does not have an extra RAID layer. Or as LSI gently puts it: “IT firmware maximizes the connectivity and performance aspects of the HBA”. Which is pretty much what we’re looking for here as I’m currently using MDADM and am planning on using ZFS in the future, who both make use of software RAID.
Requirements and preparation
- Your H310 card (pretty essential
 )
) - A Windows or Linux machine with a PCIe (2.0) x1/x4/x8/x16 slot
- a bootable USB drive
- 30 min of your time
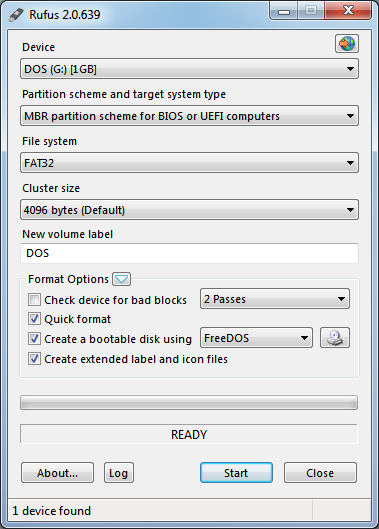
As you can see we’ll need a USB drive. It doesn’t have to be anything fancy as the files that we’ll be putting onto the flash drive are roughly 130 MB combined. Hop on over to this link to download Rufus, which is a great tool to create bootable USB drives. Run the .exe, choose the settings of your liking and hit Start. Below are the settings I’ve used:
We could now grab the latest firmware from Dell’s website and transfer it to our USB drive. I however opted to download a file which I’ve found on numerous blog posts and fora and contains all the necessary tools and firmware that we’ll need. Transfer the contents of this .rar file to your USB drive and reboot.
Detecting your card & getting the SAS-address
Upon rebooting you should be greeted with a black screen that reads:
PowerEdge Expandable RAID Controller BIOS
Copyright(c) 2011 LSI Corporation
Press <CTRL><R> to Run Configuration Utility
F/W Initializing Devices 0%
This is actually the BIOS loading screen which goes through the initial setup of the card. The next thing you should do is to boot up into your DOS partition. The stick which we formatted earlier should have 2 partitions: a non-UEFI one (regular DOS) and a UEFI-one. For now we’ll just be using the non-UEFI one. Once you’ve successfully loaded into DOS we can play around with some of the tools that are provided by LSI.
The first thing we’ll input is MegaRec -adpList
This displays a list of all the identified controllers, identified by a certain number (MR Card x). If you only have one card installed, it should display MR Card 0. Now that we’ve made sure that our card is being detected, we can request some information about the card, including the SAS address which we’ll need later on. We can do this by entering: MegaCli -AdpAllInfo -a0
This will display all of the parameters of the specified card. If we want to filter out the SAS address you can either add a pipe so you can execute multiple commands at once as such: MegaCli -AdpAllInfo -a0 | find "SAS Address"
Using this pipe symbol somehow didn’t work for me though, so you can always export the output to a separate text file on your USB drive, and then search for the SAS address manually by booting into your OS: MegaCli -AdpAllInfo > controller-info.txt
Out with the old: clear SBR and flash memory
In order to clear the SBR (Serial Boot Rom) and flash memory of our card we’ll be using the MegaRec tool once more. Before you delete the SBR, it might be a good idea to backup the original one that came with your card: MegaRec -readsbr 0 backup.sbr
You can now safely clear the SBR: MegaRec -writesbr 0 empty.bin
Next up, we’re going to erase the flash memory: MegaRec -cleanflash 0
Once this has completed successfully you should definitely reboot to make sure everything is working properly. Some even advise you to a cold reboot (i.e. completely power off your system and boot it from scratch) instead of simply rebooting. When rebooting you should notice that the BIOS loading screen of our card which I mentioned earlier is no longer being displayed. This is simply because we cleared the SBR which holds the BIOS.
In with the new: flashing our card
Depending on whether you have a Legacy BIOS o a UEFI-based system the actual flashing of the firmware follows a slightly different procedure. If you’re using the former you can simply boot up from the DOS partition on your USB drive. If you’re using UEFI, the sas2flsh commands are executed from a EFI-shell as opposed to the DOS-environnement we were in earlier. Since my ASUS P8P67 is a UEFI-based motherboard I had to boot from the UEFI-partition on my USB drive and enter the EFI-shell. If you do try to issue the sas2flsh.exe command on a UEFI-based system you’ll receive the following error:
ERROR: Failed to initialize PAL. Exiting program.
Once you’ve entered the EFI-shell you first have select the correct drive by typing fsX:, with X being the number that corresponds with the correct drive that holds all the files which we’ll be needing. You can verify this by typing ls after you’ve selected a certain drive. Similar to UNIX, this will give you a list of all the files that are inside that working directory. Important thing to note: the EFI-shell uses the sas2flash.efi program, whilst the DOS-version uses sas2flsh command. Depending on which environment you loaded up earlier, you can change out the commands which I’ll be using during the next few steps.
Now we can flash our “empty” card with the Dell firmware: sas2flash -o -f 6GBSAS.FW
The -o parameter is a switch which allows to enter advanced mode. The -f parameter specifies the filename of the firmware which we’ll be flashing from. We’ll be using the 6GBSAS.FW file, which is the official Dell IT firmware. The official LSI reference guide which explains all the possible parameters in great detail can be found here by the way. This process might take a few minutes. Once it has completed you can either reboot and go back to the EFI-prompt or you can issue this command which resets the card: sas2flash_p19.efi -o -reset
Now, we flash the card once again, but this time we use the 2118P7.BIN file. This is actually the LSI P7 IT firmware: sas2flash -o -f 2118P7.BIN
This will most likely you give you the following error, just enter yes: NVDATA Product ID and Vendor ID do not match. Would you like to flash anyway [y/n]?
You can now either reboot or use the reset command once again. And finally we can flash the card to the LSI P19 IT firmware: sas2flash_p19.efi -o -f 2118IT.BIN
Finishing up
Nearly there. Make sure to reset your card one final time. We can now verify whether everything has completed properly by using the list parameter: sas2flash_p19.efi -o -list

You should see something similar to the picture above. The NVDATA Product ID, Board Name and NVDATA Vendor show you that the card is being the detected as a SAS9211-8i. The Firmware Product ID and Firmware Version confirm that we’ve successfully loaded the LSI P19 IT firmware onto the card.
Last thing to do now is to restore the original SAS address which you should’ve written down somewhere as I explained earlier:
sas2flash_p19.efi -o -sasadd <your 16-digit SAS address>
And that’s it, you’ve successfully flashed your card to IT firmware. You could add the SBR to the card once again by running sas2flash accompanied by the -b parameter and the filename for your BIOS which has a .rom extension. As this wasn’t really necessary for me and it would only increase boot time I chose not to do this.
Comments